
In this article, i'll walk through one way to build a single-choice RecyclerView in Android. This will result in a general purpose RecyclerView-based component that mimics a typical "radio group" component you may be familiar with from html. This gives you a list of radiobuttons with one selection maximum.
RadioAdapter.java
public abstract class RadioAdapter<T> extends RecyclerView.Adapter<RadioAdapter.ViewHolder> {
    public int mSelectedItem = -1;
    public List<T> mItems;
    private Context mContext;

    public RadioAdapter(Context context, List<T> items) {
        mContext = context;
        mItems = items;
    }

    @Override
    public void onBindViewHolder(RadioAdapter.ViewHolder viewHolder, final int i) {
        viewHolder.mRadio.setChecked(i == mSelectedItem);
    }

    @Override
    public int getItemCount() {
        return mItems.size();
    }

    @Override
    public ViewHolder onCreateViewHolder(ViewGroup viewGroup, int i) {
        LayoutInflater inflater = LayoutInflater.from(mContext);
        final View view = inflater.inflate(R.layout.view_item, viewGroup, false);
        return new ViewHolder(view);
    }

    class ViewHolder extends RecyclerView.ViewHolder {

        public RadioButton mRadio;
        public TextView mText;

        public ViewHolder(final View inflate) {
            super(inflate);
            mText = (TextView) inflate.findViewById(R.id.text);
            mRadio = (RadioButton) inflate.findViewById(R.id.radio);
            View.OnClickListener clickListener = new View.OnClickListener() {
                @Override
                public void onClick(View v) {
                    mSelectedItem = getAdapterPosition();
                    notifyDataSetChanged();
                }
            };
            itemView.setOnClickListener(clickListener);
            mRadio.setOnClickListener(clickListener);
        }
    }
}
A generic view for displaying a radiobutton and title:
view_item.xml
<LinearLayout xmlns:android="http://schemas.android.com/apk/res/android"
              android:layout_width="match_parent"
              android:layout_height="match_parent"
              android:orientation="horizontal">

    <RadioButton
        android:id="@+id/radio"
        android:layout_width="wrap_content"
        android:layout_height="wrap_content"
        />

    <TextView
        android:id="@+id/text"
        android:layout_width="wrap_content"
        android:layout_height="wrap_content"
        />
</LinearLayout>
To actually use this abstract class, subclass it and construct with your specific data. Also, implement onBindViewHolder to do the specific data set up for your backing model:
PersonAdapter.java
public class PersonAdapter extends RadioAdapter<Person> {
    public PersonAdapter(Context context, List<Person> items){
        super(context, items);
    }

    @Override
    public void onBindViewHolder(ViewHolder viewHolder, int i) {
        super.onBindViewHolder(viewHolder, i);
        viewHolder.mText.setText(mItems.get(i).mLocationName);
    }
}
Just for sake of demonstration, the Person object in all its glory:
Person.java
class Person{
    public String mName;
    public Person(String name){
        mName = name;
    }
}
Finally, let's set it up!
MainActivity.java
@Override
public View onCreate(LayoutInflater inflater, ViewGroup container, Bundle savedInstanceState) {
setContentView(R.layout.activity_main);
RecyclerView recyclerView = (RecyclerView)findViewById(R.id.recycler_view);
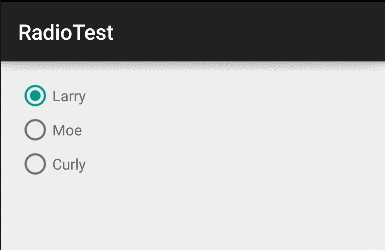
List<Person> persons = Arrays.asList(new Person("Larry"),
new Person("Moe"),
new Person("Curly"));
//basic yak shaving required
recyclerView.setLayoutManager(new LinearLayoutManager(this));
recyclerView.setAdapter(new PersonAdapter(this, persons));
}
Here's what it looks like:
Download the source here at github
Update
For the Kotlin fans, i've added an updated version of the code example here:
https://github.com/mutexkid/kotlin-radio-group-example .