Implementing Swipe to Refresh, a Material Design UI Pattern
One of the great ideas formalized in the new Material Design user interface guidelines is the Swipe to Refresh UI pattern. In fact, you’ve probably already seen and used the Swipe to Refresh pattern. It's found its way into many popular Android apps like Facebook, Google Newsstand, Trello, Gmail and many others.
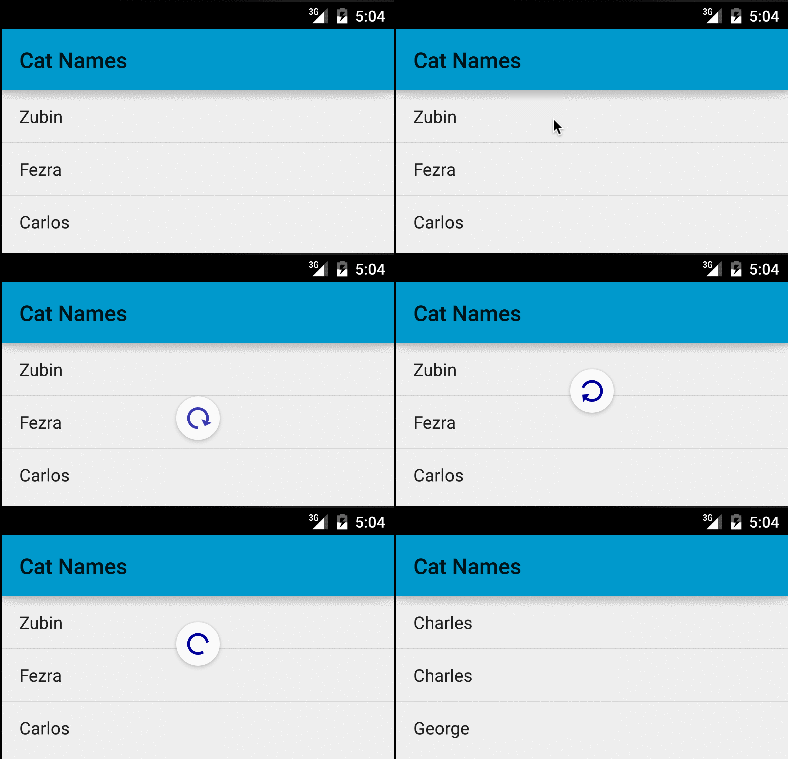
Here's what it looks like:

The Swipe to Refresh pattern is a nice fit for adapter-backed views (RecyclerView and ListView, for example) that also need to support user-requested refreshes, like a list that displays a Twitter newsfeed that’s updated by a user, on demand.
Introduced alongside KitKat and enhanced with the Lollipop release of the v4 Android support library, a working implementation of the Swipe-to-refresh UI pattern is included, called SwipeRefreshLayout . All we have to do is set it up! For your reference, the project we'll build is available for download on github here.
Setting up Swipe To Refresh
We begin implementing the Swipe-to-Refresh pattern with a brand new Android Studio project and the most recent version of the Android Support Library (your SDK manager should show an Android Support Library version of at least 21.0).
The first thing we need to do is add the support library to our application’s build.gradle file.
compile 'com.android.support:support-v4:21.0.+'
Gradle sync your project and open the layout file that was generated when we created our first Activity from the new project wizard, named res/layouts/activity_main.xml. We're going to add a ListView and a SwipeRefreshLayout widget to the layout file. The ListView will display content we want to update using the Swipe to Refresh pattern, and the SwipeRefreshLayout widget will provide the basic functionality.
 <android.support.v4.widget.SwipeRefreshLayout
        android:id="@+id/activity_main_swipe_refresh_layout"
        android:layout_width="match_parent"
        android:layout_height="wrap_content">

        <ListView
            android:id="@+id/activity_main_listview"
            android:layout_width="match_parent"
            android:layout_height="match_parent"
            >
        </ListView>

    </android.support.v4.widget.SwipeRefreshLayout>
Notice that ListView is nested within the SwipeRefreshLayout. Any time we swipe the ListView beyond the edge of the SwipeRefreshLayout, the SwipeRefreshLayout widget will display a loading icon and trigger an onRefresh event. This event is a hook for adding our own on-demand data refresh behavior for the list.
Wiring up the Adapter
Now that we've got our layout file ready, let's set up a simple data adapter. In real life, our adapter would likely be backed by a web service, remote API or database, but to keep things simple we’ll fake a web API response. Include the following xml snippet in your res/strings.xml file:
<string-array name="cat_names">
    <item>George</item>
    <item>Zubin</item>
    <item>Carlos</item>
    <item>Frank</item>
    <item>Charles</item>
    <item>Simon</item>
    <item>Fezra</item>
    <item>Henry</item>
    <item>Schuster</item>
</string-array>
and set up an adapter to fake out new responses from the “cat names web API ” for our experiment.
class MainActivity extends Activity {

  ListView mListView;
  SwipeRefreshLayout mSwipeRefreshLayout;
  Adapter mAdapter;

  @Override
  public void onCreate(Bundle savedInstanceState) {
    super.onCreate(savedInstanceState);
    setContentView(R.layout.acivity_main);
    SwipeRefreshLayout mSwipeRefreshLayout = (SwipeRefreshLayout) findViewById(R.id.activity_main_swipe_refresh_layout);
    mListView = findViewById(R.id.activity_main_list_view);
 mListView.setAdapter(new ArrayAdapter<String>(){
    String[] fakeTweets = getResources().getStringArray(R.array.fake_tweets);
    mAdapter = new ArrayAdapter<String>(this, android.R.layout.simple_list_item_1, fakeTweets)
    listView.setAdapter(mAdapter);
  });
  }
}
Defining our Data Refresh
Now that our adapter is set up, we can wire up the refresh triggered by swiping down. We'll get an animated loading indicator already "for free"; we just need to define what happens to our ListView. We will do that by defining the SwipeRefreshLayout widget's expected OnRefreshListener interface. We'll also simulate getting new data back from the CatNames webservice (we'll build a method called getNewCatNames() that will build an array of randomly shuffled fake responses from the cat names API).
@Override
  public void onCreate(Bundle savedInstanceState) {
  …
    listView.setAdapter();
    mSwipeRefreshLayout.setOnRefreshListener(new SwipeRefreshLayout.OnRefreshListener() {
      @Override
      public void onRefresh() {
            refreshContent();
          ...
  }

  // fake a network operation's delayed response
  // this is just for demonstration, not real code!
  private void refreshContent(){
    new Handler().postDelayed(new Runnable() {
          @Override
          public void run() {
    mAdapter = new ArrayAdapter<String>(MainActivity.this, android.R.layout.simple_list_item_1, getNewTweets());
    mListView.setAdapter(mAdapter);
    mSwipeRefreshLayout.setRefreshing(false);
    });
  }

  // get new cat names.
  // Normally this would be a call to a webservice using async task,
  // or a database operation

 private List<String> getNewCatNames() {
        List<String> newCatNames = new ArrayList<String>();
        for (int i = 0; i < mCatNames.size(); i++) {
            int randomCatNameIndex = new Random().nextInt(mCatNames.size() - 1);
            newCatNames.add(mCatNames.get(randomCatNameIndex));
        }
        return newCatNames;
    }
Notice the last line in refreshContent() in the previous listing: setRefreshing(false); This notifies the SwipeRefreshLayout widget instance that the work we wanted to do in onRefresh completed, and to stop displaying the loader animation.
Now, try running your app. Try swiping the ListView down and verify that the SwipeRefreshLayout loading icon displays, is dismissed, and that new tweets are loaded into the ListView. Congratulations, you've implemented the Swipe-to-Refresh pattern in your app!
Customization
You can also customize SwipeRefreshLayout’s appearance. To define your own custom color scheme to use with SwipeRefreshLayout's animated loading icon, use the appropriately named setColorSchemeResources() method. This takes a varargs of color resource ids.
First, define colors you want to appear in the SwipeRefreshLayout's animated loader:
<resources>
    <color name="orange">#FF9900</color>
    <color name="green">#009900</color>
    <color name="blue">#000099</color>
</resources>
Then call setColorSchemeResources(R.color.orange, R.color.green, R.color.blue); in the onCreate portion of your activity, after the SwipeRefreshLayout is loaded.
Deploy your program and notice the customized colors the swipe animation now uses:

SwipeRefreshLayout will rotate through the colors we provided as the loader continues to be displayed.
As you can see from this simple example, Swipe-to-Refresh is a great pattern for simplifying the problem of user-requested data updates in your app. For more info about available API options for SwipeRefreshLayout, check out the official Android documentation page.
